Hitch, Varnish4.1, Let's Encryptを使ってサイトをHTTPS化
この記事はVarnish Cache Advent Calendar 2015の20日目の記事になります。
Varnish Cache Advent Calendarで猛威を奮っているいわなちゃんさんにそそのかされたので、先日書いた録画環境で運用している録画データ視聴環境をHitch, Varnish4.1, Let's Encryptを用いてHTTPS化してみようと思います。
各種ミドルウェア・サービスについて
割と今回触ってる人が少なさそうなミドルウェア・サービスが多いので、一通り紹介します。
Hitch
泣く子も黙るVarnish SoftwareがつくってるSSL/TLS Proxyです。Varnish Cacheの方にSSL/TLS Terminationが全然来ないと思っていたら、前段でProxyしてくれる奴が出ていた...
(Varnish Softwareのこういう変に尖ってる所嫌いじゃないよ)
PROXY Protocolとか使ってお話出来るらしいので、今回使って繋いでみたいと思います。
Varnish Cache
みんな大好きVarnish Cache。自前でHTTPをホストすることはできませんが、前段としてProxyして置いてCacheさせると絶大な威力を発揮します。
あと大体困ったらいわなちゃんさんに聞けばいいので気楽
Let's Encrypt
割と最近ホットな奴。mozillaやAkamaiなどが共同でやってる新しい認証局です。SSL証明書を無料で発行できるので一役買ってもらいます。
今回のサーバ構成
以下のようにします。サムネイルのマスタから動的にサムネ画像生成を行うため、go-thumberを噛ませているのと、動画ファイルのホストにNginxを使っています。Varnish Cacheではファイルのホストはできないので、別にApacheでもH2Oでもlighttpdでも好きなの使えばよさげです。

構築してみる
既にNginxは使っていたのでそのまま使います。適当にソースからビルドしたものを使用しています。バージョンは1.7.10でした。
$ sudo nginx -v
nginx version: nginx/1.7.10
Varnish4.1をインストール
公式にUbuntuでのインストール方法が載っているのでそこにならってインストールします。
Installation on Ubuntu | Varnish Community
なお、私の場合はTrusty(14.04)ではなくPrecise(12.04)だったため、最初間違ってTrusty用のパッケージをインストールしようとして失敗し、少しハマりました。多分こんなハマり方する人は居ないと思いますが気をつけましょう。Preciseにインストールする際はaptリポジトリを以下のように設定します
-$ echo "deb https://repo.varnish-cache.org/ubuntu/ trusty varnish-4.1" >> /etc/apt/sources.list.d/varnish-cache.list
+$ echo "deb https://repo.varnish-cache.org/ubuntu/ precise varnish-4.1" >> /etc/apt/sources.list.d/varnish-cache.list
Hitchをインストール
githubからクローンしてきて、ソースからビルドしましょう。
(~) $ git clone https://github.com/varnish/hitch
(~) $ cd ./hitch
bootstrapというスクリプトがあり、いろいろよしなに準備してくれるのでそれを叩きます
( ~/hitch) $ ./bootstrap
+ set -o errexit
+ aclocal
+ autoconf
+ autoheader
+ automake --add-missing --foreign
configure.ac:9: installing `./install-sh'
configure.ac:9: installing `./missing'
src/Makefile.am: installing `./depcomp'
configureが生成されました。叩きましょう
( ~/hitch) $ ./configure
checking for a BSD-compatible install... /usr/bin/install -c
checking whether build environment is sane... yes
checking for a thread-safe mkdir -p... /bin/mkdir -p
checking for gawk... no
checking for mawk... mawk
checking whether make sets $(MAKE)... yes
checking for gcc... gcc
checking whether the C compiler works... yes
checking for C compiler default output file name... a.out
checking for suffix of executables...
checking whether we are cross compiling... no
checking for suffix of object files... o
checking whether we are using the GNU C compiler... yes
checking whether gcc accepts -g... yes
checking for gcc option to accept ISO C89... none needed
checking for style of include used by make... GNU
checking dependency style of gcc... gcc3
checking whether make sets $(MAKE)... (cached) yes
checking whether to enable maintainer-specific portions of Makefiles... no
checking for ev_default_loop in -lev... no
configure: error: Cannot find libev headers.
(~/hitch) $
libevがないと怒られました。入れて再度configureを叩きます
(~/hitch) $ sudo apt-get update && sudo aptitude install libev-dev
(~/hitch) $ ./configure
checking for a BSD-compatible install... /usr/bin/install -c
checking whether build environment is sane... yes
checking for a thread-safe mkdir -p... /bin/mkdir -p
checking for gawk... no
checking for mawk... mawk
checking whether make sets $(MAKE)... yes
checking for gcc... gcc
checking whether the C compiler works... yes
checking for C compiler default output file name... a.out
checking for suffix of executables...
checking whether we are cross compiling... no
checking for suffix of object files... o
checking whether we are using the GNU C compiler... yes
checking whether gcc accepts -g... yes
checking for gcc option to accept ISO C89... none needed
checking for style of include used by make... GNU
checking dependency style of gcc... gcc3
checking whether make sets $(MAKE)... (cached) yes
checking whether to enable maintainer-specific portions of Makefiles... no
checking for ev_default_loop in -lev... yes
checking for SSL_CTX_free in -lssl... yes
checking how to run the C preprocessor... gcc -E
checking for grep that handles long lines and -e... /bin/grep
checking for egrep... /bin/grep -E
checking for ANSI C header files... yes
checking for sys/types.h... yes
checking for sys/stat.h... yes
checking for stdlib.h... yes
checking for string.h... yes
checking for memory.h... yes
checking for strings.h... yes
checking for inttypes.h... yes
checking for stdint.h... yes
checking for unistd.h... yes
checking for stdlib.h... (cached) yes
checking for unistd.h... (cached) yes
checking for uid_t in sys/types.h... yes
checking for inline... inline
checking for int32_t... yes
checking for pid_t... yes
checking for size_t... yes
checking for ssize_t... yes
checking for uint32_t... yes
checking vfork.h usability... no
checking vfork.h presence... no
checking for vfork.h... no
checking for fork... yes
checking for vfork... yes
checking for working fork... yes
checking for working vfork... (cached) yes
checking for stdlib.h... (cached) yes
checking for GNU libc compatible malloc... yes
checking for stdlib.h... (cached) yes
checking for unistd.h... (cached) yes
checking for sys/param.h... yes
checking for getpagesize... yes
checking for working mmap... yes
checking for inet_ntoa... yes
checking for accept4... yes
configure: creating ./config.status
config.status: creating Makefile
config.status: creating src/Makefile
config.status: creating config.h
config.status: executing depfiles commands
(~/hitch) $
問題なく完了しました。makeしていきましょう
(~/hitch) $ make
make  all-recursive
make[1]: ディレクトリ `/home/pi9min/hitch' に入ります
Making all in src
make[2]: ディレクトリ `/home/pi9min/hitch/src' に入ります
gcc -DHAVE_CONFIG_H -I. -I..  -I/usr/include/libev/  -O2 -g -std=c99 -fno-strict-aliasing -Wall -W -D_GNU_SOURCE  -g -O2 -MT configuration.o -MD -MP -MF .deps/configuration.Tpo -c -o configuration.o configuration.c
mv -f .deps/configuration.Tpo .deps/configuration.Po
gcc -DHAVE_CONFIG_H -I. -I..  -I/usr/include/libev/  -O2 -g -std=c99 -fno-strict-aliasing -Wall -W -D_GNU_SOURCE  -g -O2 -MT ringbuffer.o -MD -MP -MF .deps/ringbuffer.Tpo -c -o ringbuffer.o ringbuffer.c
mv -f .deps/ringbuffer.Tpo .deps/ringbuffer.Po
gcc -DHAVE_CONFIG_H -I. -I..  -I/usr/include/libev/  -O2 -g -std=c99 -fno-strict-aliasing -Wall -W -D_GNU_SOURCE  -g -O2 -MT hitch.o -MD -MP -MF .deps/hitch.Tpo -c -o hitch.o hitch.c
mv -f .deps/hitch.Tpo .deps/hitch.Po
gcc -DHAVE_CONFIG_H -I. -I..  -I/usr/include/libev/  -O2 -g -std=c99 -fno-strict-aliasing -Wall -W -D_GNU_SOURCE  -g -O2 -MT vpf.o -MD -MP -MF .deps/vpf.Tpo -c -o vpf.o vpf.c
mv -f .deps/vpf.Tpo .deps/vpf.Po
gcc -DHAVE_CONFIG_H -I. -I..  -I/usr/include/libev/  -O2 -g -std=c99 -fno-strict-aliasing -Wall -W -D_GNU_SOURCE  -g -O2 -MT flopen.o -MD -MP -MF .deps/flopen.Tpo -c -o flopen.o flopen.c
mv -f .deps/flopen.Tpo .deps/flopen.Po
gcc -O2 -g -std=c99 -fno-strict-aliasing -Wall -W -D_GNU_SOURCE  -g -O2   -o hitch configuration.o ringbuffer.o hitch.o vpf.o flopen.o   -lcrypto  -lssl -lev
make[2]: ディレクトリ `/home/pi9min/hitch/src' から出ます
make[2]: ディレクトリ `/home/pi9min/hitch' に入ります
rst2man --halt=2 hitch.man.rst hitch.8
/bin/bash: rst2man: コマンドが見つかりません
make[2]: *** [hitch.8] エラー 127
make[2]: ディレクトリ `/home/pi9min/hitch' から出ます
make[1]: *** [all-recursive] エラー 1
make[1]: ディレクトリ `/home/pi9min/hitch' から出ます
make: *** [all] エラー 2
(~/hitch) $
rst2manがないと怒られました。Ubuntuだとpython-docutilsというパッケージに入っているのでインストールし、再度makeに挑戦します。
(~/hitch) $ sudo aptitude install python-docutils
(~/hitch) $ make
make  all-recursive
make[1]: ディレクトリ `/home/pi9min/hitch' に入ります
Making all in src
make[2]: ディレクトリ `/home/pi9min/hitch/src' に入ります
gcc -DHAVE_CONFIG_H -I. -I..  -I/usr/include/libev/  -O2 -g -std=c99 -fno-strict-aliasing -Wall -W -D_GNU_SOURCE  -g -O2 -MT configuration.o -MD -MP -MF .deps/configuration.Tpo -c -o configuration.o configuration.c
mv -f .deps/configuration.Tpo .deps/configuration.Po
gcc -DHAVE_CONFIG_H -I. -I..  -I/usr/include/libev/  -O2 -g -std=c99 -fno-strict-aliasing -Wall -W -D_GNU_SOURCE  -g -O2 -MT ringbuffer.o -MD -MP -MF .deps/ringbuffer.Tpo -c -o ringbuffer.o ringbuffer.c
mv -f .deps/ringbuffer.Tpo .deps/ringbuffer.Po
gcc -DHAVE_CONFIG_H -I. -I..  -I/usr/include/libev/  -O2 -g -std=c99 -fno-strict-aliasing -Wall -W -D_GNU_SOURCE  -g -O2 -MT hitch.o -MD -MP -MF .deps/hitch.Tpo -c -o hitch.o hitch.c
mv -f .deps/hitch.Tpo .deps/hitch.Po
gcc -DHAVE_CONFIG_H -I. -I..  -I/usr/include/libev/  -O2 -g -std=c99 -fno-strict-aliasing -Wall -W -D_GNU_SOURCE  -g -O2 -MT vpf.o -MD -MP -MF .deps/vpf.Tpo -c -o vpf.o vpf.c
mv -f .deps/vpf.Tpo .deps/vpf.Po
gcc -DHAVE_CONFIG_H -I. -I..  -I/usr/include/libev/  -O2 -g -std=c99 -fno-strict-aliasing -Wall -W -D_GNU_SOURCE  -g -O2 -MT flopen.o -MD -MP -MF .deps/flopen.Tpo -c -o flopen.o flopen.c
mv -f .deps/flopen.Tpo .deps/flopen.Po
gcc -O2 -g -std=c99 -fno-strict-aliasing -Wall -W -D_GNU_SOURCE  -g -O2   -o hitch configuration.o ringbuffer.o hitch.o vpf.o flopen.o   -lcrypto  -lssl -lev
make[2]: ディレクトリ `/home/pi9min/hitch/src' から出ます
make[2]: ディレクトリ `/home/pi9min/hitch' に入ります
make[2]: ディレクトリ `/home/pi9min/hitch' から出ます
make[1]: ディレクトリ `/home/pi9min/hitch' から出ます
(~/hitch) $
無事makeできました。インストールします。
(~/hitch) $ sudo make install
Making install in src
make[1]: ディレクトリ `/home/pi9min/hitch/src' に入ります
make[2]: ディレクトリ `/home/pi9min/hitch/src' に入ります
test -z "/usr/local/sbin" || /bin/mkdir -p "/usr/local/sbin"
  /usr/bin/install -c hitch '/usr/local/sbin'
make[2]: `install-data-am' に対して行うべき事はありません.
make[2]: ディレクトリ `/home/pi9min/hitch/src' から出ます
make[1]: ディレクトリ `/home/pi9min/hitch/src' から出ます
make[1]: ディレクトリ `/home/pi9min/hitch' に入ります
make[2]: ディレクトリ `/home/pi9min/hitch' に入ります
make[2]: `install-exec-am' に対して行うべき事はありません.
test -z "/usr/local/share/doc/hitch" || /bin/mkdir -p "/usr/local/share/doc/hitch"
 /usr/bin/install -c -m 644 hitch.conf.ex CHANGES.rst README.md '/usr/local/share/doc/hitch'
test -z "/usr/local/share/man/man8" || /bin/mkdir -p "/usr/local/share/man/man8"
 /usr/bin/install -c -m 644 hitch.8 '/usr/local/share/man/man8'
make[2]: ディレクトリ `/home/pi9min/hitch' から出ます
make[1]: ディレクトリ `/home/pi9min/hitch' から出ます
(~/hitch) $ rehash
(~/hitch) $ which hitch
/usr/local/sbin/hitch
インストール完了。
Let's Encryptの設定
さて大体ミドルウェアの設定は終わったので、今回のキモである証明書まわりの設定を行いましょう。 まずLet's Encryptのリポジトリをクローンしてきて適当な位置に配置しておきます。
(~) $ git clone https://github.com/letsencrypt/letsencrypt.git
(~) $ cd letsencrypt/
次にREADMEにもあるように、letsencrypt-autoコマンドによって自動設定を行います。Ubuntuの場合だとaptリポジトリからガンガンパッケージをインストールしていくので結構おっかない感じがありますが、まぁ目をつぶりましょう。
(~/letsencrypt) $ ./letsencrypt-auto --help
(--helpが付いてるのは多分設定完了後にhelp表示するだけです。)
次に証明書発行をやらねばいけないのですが、すでにNginx等でHTTPホストが生えている場合はACMEチャレンジ用の設定とか色々あって面倒なので今回は割愛します。 (というかLet's Encryptは他の皆さんが記事一杯かいてるのでそっち参考にしてもらえるとよさそう)
今回は証明書の発行まで完了し、以下のように証明書が配置されていると仮定して進めていきます。
(~) $ sudo ls -l /etc/letsencrypt/live/example.com/
total 0
lrwxrwxrwx 1 root root 36 11月 17 09:21 cert.pem -> ../../archive/example.com/cert1.pem
lrwxrwxrwx 1 root root 37 11月 17 09:21 chain.pem -> ../../archive/example.com/chain1.pem
lrwxrwxrwx 1 root root 41 11月 17 09:21 fullchain.pem -> ../../archive/example.com/fullchain1.pem
lrwxrwxrwx 1 root root 39 11月 17 09:21 privkey.pem -> ../../archive/example.com/privkey1.pem
上記archiveディレクトリからシンボリックリンクが張られていますが、今後は証明書更新するごとに古い物がrotateされる感じになってます。 (以下2回目の証明書発行を行った環境のarchiveディレクトリ)
(~) $ sudo ls -l /etc/letsencrypt/archive/example.com
total 32
-rw-r--r-- 1 root root 2167 12月  4 20:00 cert1.pem
-rw-r--r-- 1 root root 2167 12月  4 22:27 cert2.pem
-rw-r--r-- 1 root root 1675 12月  4 20:00 chain1.pem
-rw-r--r-- 1 root root 1675 12月  4 22:27 chain2.pem
-rw-r--r-- 1 root root 3842 12月  4 20:00 fullchain1.pem
-rw-r--r-- 1 root root 3842 12月  4 22:27 fullchain2.pem
-rw-r--r-- 1 root root 3272 12月  4 20:00 privkey1.pem
-rw-r--r-- 1 root root 3272 12月  4 22:27 privkey2.pem
(オプション) DB鍵交換用パラメータ作成
よくSSLテストでスコアを高めるために指定するアレです。opensslで簡単に作成できるので作っておきます。 今回は2048ビットにしておきます。
(~) $ openssl dhparam 2048 -out dhparam.pem
hitch, varnishの設定
さて証明書は発行できましたが、Hitchでは複数ファイルの証明書を指定できないため1つのファイルにしてしまいます。
(~) $ sudo cat /etc/letsencrypt/live/example.com/privkey.pem /etc/letsencrypt/live/example.com/fullchain.pem dhparam.pem > /etc/hitch/example.com.pem
ホントはLet's Encryptで再度証明書を更新する際に自動で1つのファイルにCombineするようにするべきだと思いますが、まぁそれはまた別の機会にでもやります。 できあがった証明書はhitch.confにて指定します。hitch.confは以下のようになりました。
(~) $ cat /etc/hitch/hitch.conf
# Listening
frontend       = "[*]:443"
pem-file       = "/etc/hitch/example.com.pem";
ciphers        = "EECDH+AESGCM:EDH+AESGCM:AES256+EECDH:AES256+EDH"
backend        = "[127.0.0.1]:6086"
write-proxy-v2 = on
workers        = 2
backlog        = 100
keepalive      = 3600
syslog         = on
user           = "www-data"
daemon         = on
(ciphersとかは割と雑なので見逃してください) 上記confでbackendに指定しているのがvarnishです。varnish側は以下のような設定で起動しています
- 127.0.0.1:6086でPROXY Protocolで受ける
- キャッシュファイルはストレージに20GBまで保存する
(~) $ cat /etc/default/varnish
# Should we start varnishd at boot?  Set to "no" to disable.
START=yes

# Maximum number of open files (for ulimit -n)
NFILES=131072

# Maximum locked memory size (for ulimit -l)
# Used for locking the shared memory log in memory.  If you increase log size,
# you need to increase this number as well
MEMLOCK=82000

INSTANCE=$(uname -n)

DAEMON_OPTS="-a 127.0.0.1:6086,PROXY \
             -T localhost:6082 \
             -f /etc/varnish/default.vcl \
             -s file,/var/lib/varnish/$INSTANCE/varnish_storage.bin,20G"
Varnish側の設定(default.vcl)は基本後ろのNginxにすべてPassするような設定を書いておきます。もっと複雑なことを本来はさせているのですが今回はシンプルにしています。
(~) $ cat /etc/varnish/default.vcl
vcl 4.0;

backend nginx {
    .host = "127.0.0.1";
    .port = "8080";
}

sub vcl_recv {
    set req.backend_hint  = nginx;
}
これでHitch→VarnishでサイトをHTTPS化できるはずです。実際に起動してアクセスしてみましょう。
サイトにアクセス
まずは各種ミドルウェアが起動しているか確認しておきましょう。起動していなかったら適宜起動してください
(~) $ ps aux | grep -e hitch -e varnish -e nginx
root     27418  0.0  0.0  31004    36 ?        Ss   Dec09   0:00 nginx: master process nginx
www-data 27419  0.5  0.0  31656  1008 ?        S    Dec09  81:21 nginx: worker process
root     27459  0.0  0.0  28688   176 ?        Ss   Dec09   0:00 hitch --config=/etc/hitch/hitch.conf
www-data 27460  0.3  0.0  41816  3124 ?        S    Dec09  60:27 hitch --config=/etc/hitch/hitch.conf
www-data 27461  0.1  0.0  29892  2316 ?        S    Dec09  16:45 hitch --config=/etc/hitch/hitch.conf
pi9min   28844  0.0  0.0  10360   896 pts/3    S+   19:55   0:00 grep -e hitch -e varnish -e nginx
varnish  31130  0.0  0.0 124580   532 ?        Ss   Dec10   2:09 /usr/sbin/varnishd -P /run/varnishd.pid -a 127.0.0.1:6086,PROXY -T localhost:6082 -f /etc/varnish/default.vcl -s file,/var/lib/varnish/file/varnish_storage.bin,20G
varnish  31132  0.4  1.1 21335408 93944 ?      Sl   Dec10  69:51 /usr/sbin/varnishd -P /run/varnishd.pid -a 127.0.0.1:6086,PROXY -T localhost:6082 -f /etc/varnish/default.vcl -s file,/var/lib/varnish/file/varnish_storage.bin,20G
無事すべて起動しているようです。ではHTTPSで適当にアクセスしてみましょう。 まずはcurlで叩いてみます。
(~) $ curl -k -H 'Host: example.com' -I https://127.0.0.1/images/0/5/050bbe99190aa85155b5d5c61d7f8b17d5d95920.jpg
HTTP/1.1 200 OK
Server: nginx
Date: Sun, 20 Dec 2015 10:58:51 GMT
Content-Type: image/jpeg
Content-Length: 49994
Last-Modified: Wed, 09 Dec 2015 16:56:26 GMT
X-Varnish: 854525
Age: 0
Via: 1.1 varnish-v4
Accept-Ranges: bytes
Connection: keep-alive
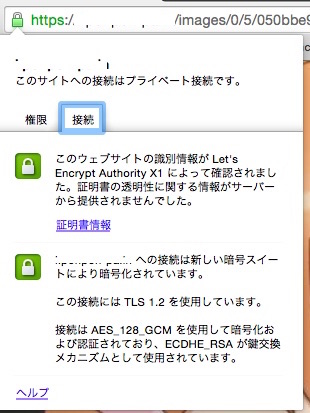
無事200が返って来ています。後ろはNginxなのでServerヘッダはnginxで問題ないですね。ViaヘッダでVarnish4をProxyしていることもわかります。 では実際にブラウザでアクセスしてみましょう。

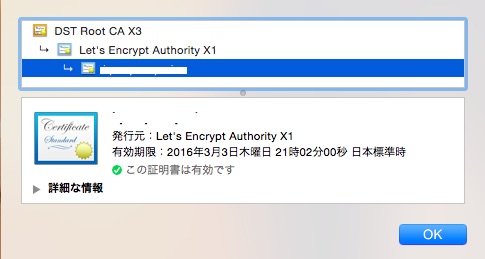
無事鍵マークが表示されていますね!しっかりLet's Encrypt製なのもわかります。

証明書の期限は90日のようです。自動で更新できる仕組みを作ってしまえばなんてことないですね!
最後に
今回はちょっと珍しいHitch, Varnish4.1の組み合わせでサイトをHTTPS化してみました。HitchはTLS/SSL Proxyとしての機能しかなく、ログの一つも満足に出る状況ではありません(今後実装する予定は有るみたいなので期待して待ってる所です)
ですが、Varnish Softwareのミドルウェアのみ(厳密にファイルのホストはできてないけど...)でHTTPS化できたという満足感があります。 Hitchはわりかし開発速度が早くガンガン更新されているので、今後も見守りつつ個人サイトでは愛用していくつもりです。
以上です。